By popular demand (okay, one person asked for a picture but that’s popular enough for me) here’s how to make delightful little boxes from old used (or brand new if you don’t save old ones) greeting cards.

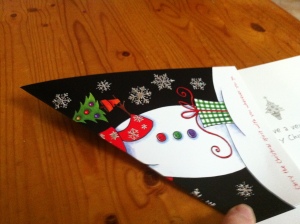
1. Find two Christmas Cards.
I used two cards, one for the top and one for the bottom of the box. You can also cut a card in two and use the front for the top and the inside for the bottom. It makes a smaller box. Both pieces have to be the same size and square.
2. Making it Square
So fold a corner up to an edge so that the fold is the diagonal from one corner to the other and cut off the excess on the side. This is so incredibly easy to do and so unbelievably confusing to put into words. Make two same size square pieces. I don’t really care how you do it.

3. A Square with a diagonal fold.
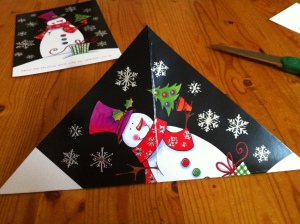
4. Making the other diagonal fold
Next make a diagonal fold between the other two corners. Then fold every point into the centre where the two folds cross.
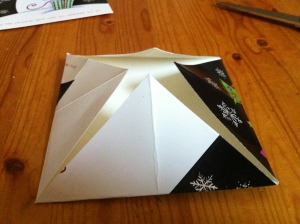
5. Folding the points into the centre.
Fold each flat side into the middle (and then back out), one at a time, so that when you open the whole thing up it’s completely covered in little scored squares.
6. Folding the flat sides into the centre.

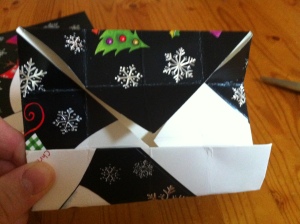
7. The card is now a whole mess of little squares in every direction with triangles at the corners.
The center four little squares are the bottom of the box. Or the center of the lid, depending on which one you’re making, but they’re both the same so it doesn’t matter what you call them.
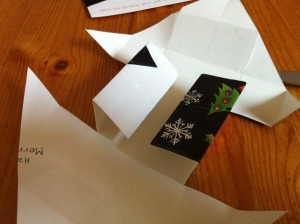
From opposite corners on either side of the little triangle, make a cut from the outer edge to the edge of that little four squared center. So two corners, two triangles, four cuts in all.

8. Making the four crucial cuts. If you screw this up, I’m going to be so disappointed.
Those two floppy pieces that you’ve just cut free from the square when folded in will be the two sides of the box that have flat edges and no points to fold in. If that makes no sense, please ignore it and look at the picture.
Fold them towards the centre section by section, like rolling them up in folds. Then do the same thing with the other sides.
9. Folding the flat sides in to the centre.
Then you turn the box so that you have a pointy ended side in each hand with the flat side in the middle. Fold the points in until they meet or cross or whatever the hell it is they do, and then fold the flat side over top of them to hold them in place.
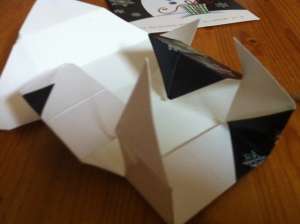
10. Fold two pointy sides under the flat side. Crap, even I don’t really understand what happened in this picture.
Repeat that for the other side.
11. One side done, one to go. Folding the flat side over the overlapping pointy sides.
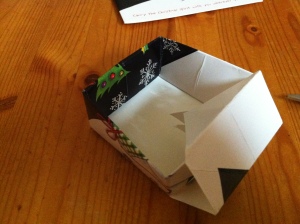
For some reason or other, if you’re aggressive enough and pinch the corners, the whole thing holds together.
12. Yay! If this is sort of what you ended up with, you’re halfway there!
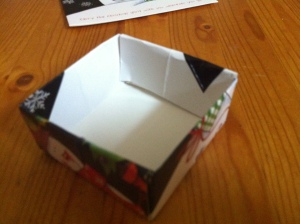
Don’t even think about stopping until it looks like this. And then you get to start over and make another one exactly the same. Gawd, are we having fun yet? Then you use what’s left of your aggression to fit the two pieces together to form a cute little box.
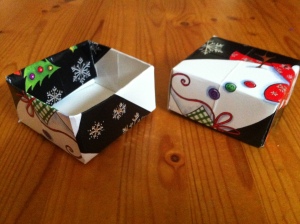
13. Top plus bottom equals box.
Ta Da!!
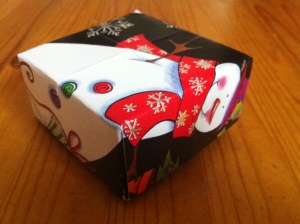
14. Right side up
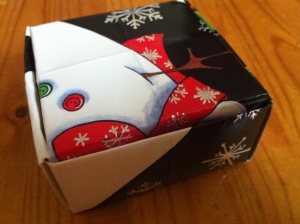
15. Upside down.
I don’t know about you, but now I need a drink. These little boxes are a perfect size for jewelry or lip gloss or hair accessories. Or you can just decorate with them, by placing about six empty ones under your tree as a joke.
But do trust me on this one – little girls love these little boxes almost as much as they love little purses. You might have to make a couple dozen for all the tiny treasures they’re going to want to stash away inside them.

I know these “how-to” posts take a lot of time to create, so thanks for doing so, so that the rest of us can use this cute idea! I especially love your humorous comments. I will give this a try!
LikeLike
I don’t normally do ‘how-to’s and now I know why. The pictures loaded in reverse order for starters. I was really tempted for a minute or two to leave it like that… lol
LikeLike
My daughter loves these boxes – now I know where she can follow the directions. Thanks!
LikeLike
Hope she has fun – they’re actually pretty easy, and there’s no glue/tape/staples involved.
LikeLike
Okay, it looks scary but I’m going to try. It probably is indeed much easier than it looks when you have to explain it. Thanks! Now I know why I keep those cards.
LikeLike
Sorry I didn’t know how to make this process less scary looking. Once you make a couple of them you’ll wonder what all the fuss was about, because they’re really very simple.
LikeLike
nice post
LikeLike
thank you 🙂
LikeLike
I don’t remember if I *actually* commented when you mentioned them, but I definitely commented in my head – thanks for the how-to, these are too sweet!
LikeLike
Thanks trophos – I comment a lot in my head too! lol
LikeLike
I have a little girl in mind for those so hope it will work out. Perhaps a little drink before I begin?
LikeLike
haha…Before, after, during – I’m pretty flexible on that step. 🙂
LikeLike
the end result is fantastic thank you for showing us how to do it WOW!
LikeLike
That’s great! I have made boxes out of cards before, but they are much much lamer, and they require either glue, tape or staples. I think I’ll be swtiching to your method for sure!
LikeLike
Neat and clever! Way to recycle!
LikeLike
My head is really spinning now (not just from pain medication) but as soon it clears a little, I’m going to try this. The box is darling.
Lillian
lillianscupboard.wordpress.com
LikeLike
Wow, that is awesome. No way could I ever figure that out. Amazing!!!
LikeLike
Pingback: Holiday Cards For The End Of The World! ~Yay! « The Cheeky Diva